Knowledge Base
Getting to Know You: A Guide to CoD Radiants Interface
A guide to the CoDRadiant Interface
This tutorial assumes that you have no knowledge of mapping, or no knowledge of using any version of Radiant.
Now that you have the preferences for CoD Rad set up, its time to learn a little bit about the editor itself.
CoD Radiant's Layout
As I stated in the previous tutorial its possible to select one of 4 different layouts for your editor. I'm using layout 1 (the left most option) for this tutorial, so it may be handy for you to do the same.
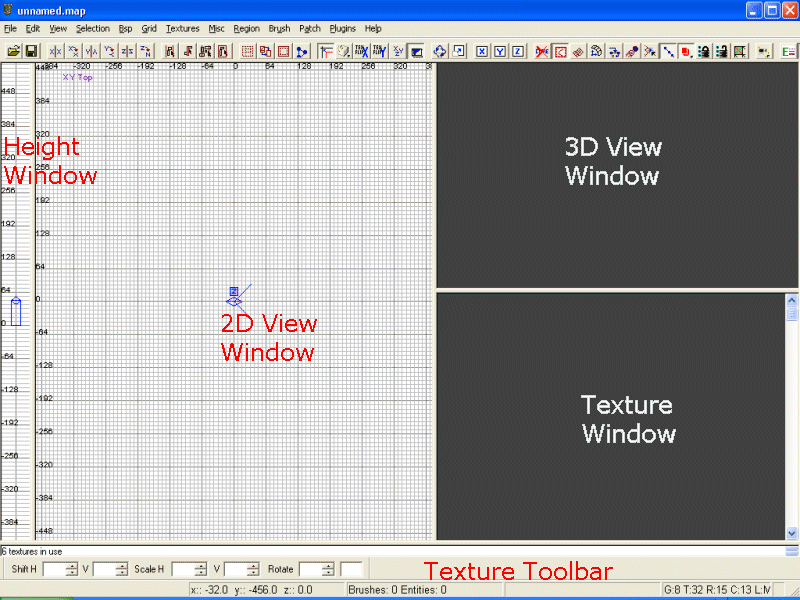
There are five "sections" to the CoD Radiant main screen.
- Height Window - Shows the "height" or Z-Axis of your map
- 2D Window - To begin with this shows a 2d representation of the map (This can be changed using the options).
- 3D Window - This is the 3D view of your map
- Texture Window - This is where textures are displayed for you to choose.
- Texture Toolbar - This allows you to manipulate textures.
CoD Radiant's Buttons
Along the top of CoD Radiant you will notice a long row of buttons. These are shortcuts that can be used to make your life slightly easier. I will go through the more useful relevant ones here.

- Open : This opens a previously saved map into CoD Radiant.
- Save : Saves the current map.

- X-Axis Flip : Flips the selected brush along the x-axis.
- X-Axis Rotate : Rotates the selected brush along the x-axis.
- Y-Axis Flip : Flips the selected brush along the y-axis.
- Y-Axis Rotate : Rotates the selected brush along the y-axis.
- Z-Axis Flip : Flips the selected brush along the x-axis.
- Z-Axis Rotate : Rotates the selected brush along the x-axis.

- Select Complete Tall : Flips the selected brush along the x-axis.
- Select Touching : Rotates the selected brush along the x-axis.
- Select Partial Tall : Flips the selected brush along the y-axis.
- Select Inside : Rotates the selected brush along the y-axis.

- CSG Subtract : Subtracts the selected brush from another brush.
- CSG Merge : Allows you to merge 2 brushs, to create 1 brush.
- CSG Hollow : Hollows a selected brush.
- Clipper : Toggles clipping. This is covered in the brush manipulation tutorial.

- Toggle Snap to Grid : With this on, your brushes will snap to the nearest gridline.
- Texture View Mode : Different viewing options for the 3D Window.
- Flip Texture X : Flips the texture on the selected face, along the x-axis.
- Flip Texture Y : Flips the texture on the selected face, along the y-axis.
- Change View : Certain layouts (ie layout 1) allow the 2D view to be changed.
- Cubic Clip the Camera View : Clips the view in the 3D window. Handy when working on a large map.

- Free Rotation : Allows you to rotate a selected brush.
- Free Scaling : Allows you to increase / decrease the scale of a brush

- Lock X : Locks the selected brush's x-axis.
- Lock Y : Locks the selected brush's y-axis.
- Lock Z : Locks the selected brush's z-axis.

-
Don't Select Curved Brushes : With this selected you cannot select a curved brush.
-
Show Patch Bounding Box : Shows the bounding box of a patch.
-
Show Patches As Wireframes : Shows a patch as a wireframe.
-
Patch Bend Mode : Allows you to bend the selected patch mesh.
-
Redisperse patch points : This will "normalize" your vertex points over thie serface area. of your patch. Works better from the drop down then the icon since I use del and ins for zooming.
-
Put caps on the current patch : If you have a cylinder patch selected for exmaple it will cap it with a one click.
-
?? :
-
Welds equal patch points during move : ??
-
Selects drill down rows and columns : ??
-
Toggles lock patch vertex mode : When selected highlighting vertexs will lock them.
-
Toggles unlock patch vertex mode : When selected highlighting vertexs will unlock them.
-
Cycles edge direction on terrain quads : ??

- Splines : ??

- Show entities as : Shows entites in the 3D window as your selection.
- Toggle camera movement mode : Selects the modes of camera movement. This is covered in greater detail below.
- Toggle alpha rendering of textures : View alpha textures as they would be shown in-game.
- Disable selection of entities : With this selected you cannot select an entity.
- Toggle drawing of draw toggle surfs : ??
- Toggle drawing of tolerant wield lines : Click on the TW box in the toolbar at the top right. Select the 2 patches you want to join. They must be close enough for them join, when they are a highlighted line will connect the vertices that will snap together. You can drag select as many of the vertices as you like and they will connect to their highlighted partner.
- Toggle if models are selectable : With this selected you cannot select a model.
- ?? :
The Camera
A quick word on camera manipulation. I use Mode 2 (with the button clicked in).
Mode 2 is, i feel, by far the best camera mode to use and its the one i'll be using for this tutorial and others after that. To move the camera about the 3D view you can use the arrow keys on your keyboard. D and C will move the camera up and down respectively. A and Z will tilt the camera up and down respectively. The arrow keys will move you forward, backward and rotate the camera left and right.
A better way to manipulate the camera is to use the mouse. In the 3d view click and hold your right mouse button, now move the mouse around and see what happens to the camera. Forward and back move the camera forward and back, whilst side-to-side turns the camera view from left to right.
Holding down Ctrl + Right Mouse Button : Pushing forward / backwards on the mouse allows you to raise / lower the height of the camera, whilst moving the mouse left/right allows you to strafe in that direction.
Holding down Shift + Ctrl + Right Mouse Button : This gives you a "free view" mode, where you can rotate the camera anywhere on the spot.
right button and move the camera around. This will be like looking around in the game. If your ever lost in the gray void you can re-position your camera in the 2d view by CTRL+MIDDLE clicking. Combine that with the middle click to point the camera and you can quickly set your camera anywhere.
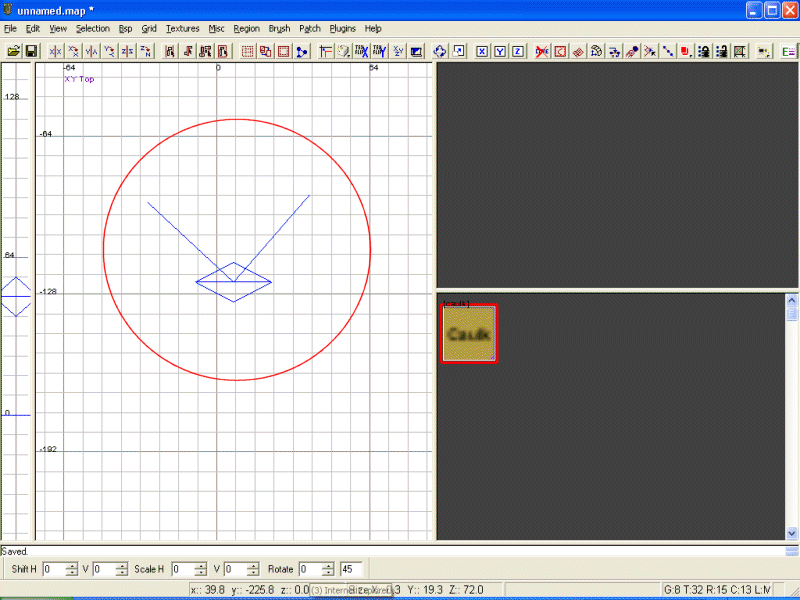
This is the "camera" (see below). The two lines are its field of view. I.e everything in between those 2 lines will be shown in the 3d box. You can point the camera by clicking with your middle mouse button on the 2d map. To find the camera press Alt + X.
To zoom in and out on your 2d view you can use your mouse's scroll wheel or use Insert and Delete. To move around the 2d view rightclick and hold and move your mouse in the required direction. Moving your mouse towards you will move the map up and vice versa. Moving your mouse right will move your map left and vice versa.
The Menus
There are 13 pull down menus in MoH Radiant. It would take more than a few pages to cover them in detail, but thankfully most are selfexplainatory, so i'll just mention them briefly.
- File : Allows you to save / load your maps. You can also save / load prefabs.
- Edit : You can find brushes / entites with this list. Also gives you access to the preferences scrren.
- View : Lists all the different view possibilities.
- Selection : Gives you all the various brush selection options
- BSP : Ignore this
- Grid : All the various grid size options.
- Textures : Lists all the texture groups, and some texture options.
- Misc : Allows you to set different colours within MoH Radiant.
- Region : ??
- Brush : You can create many sided brushes easily with this menu, along with a few special shapes.
- Patch : Allows you to create and manipulate Patch meshes
- Plugins : Gives you any plugin options you have.
- Help: Gives you a list of all the keyboard shortcuts available.
Well thats all the basics you should need for just now. You will pick up more as you go through the tutorials or just while you map.
Written by Surgeon